I’ll admit, it’s been challenging for me to create a DIY tutorial about how you can install molding (otherwise known as trim or paneling) in your home, mostly because there are a lot of intricacies and I sometimes find it hard to understand it myself, let alone explain how to do it. I felt I had my own quirky approach to this and wanted to make sure that the information I am putting out there made sense and was actually useful.
I will say that installing molding can be simple once you get the hang of it and now it’s almost soothing to measure, cut and install each piece. Unsure if that makes me a sociopath or not.
PLANNING YOUR MOLDING/TRIM
There are many many ways to get creative with planning out molding, but here are some things to keep in mind:
- The layout/size of the boxes. Pinterest is filled with ideas, but here are a few ideas/examples:
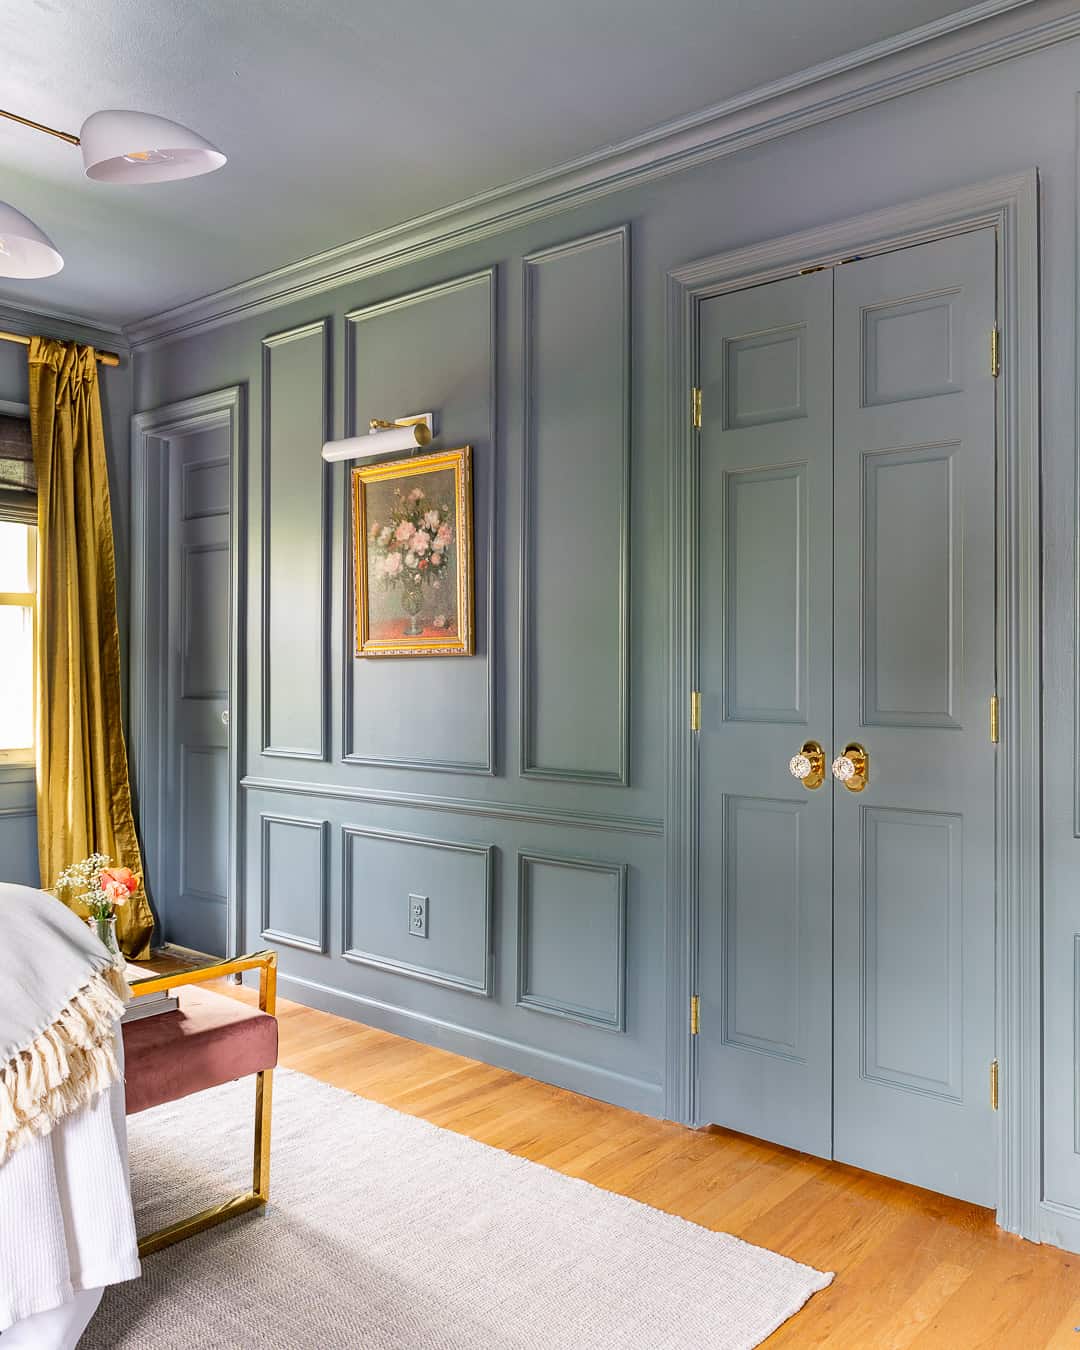
- Floor to ceiling (base to crown), like our living room walls
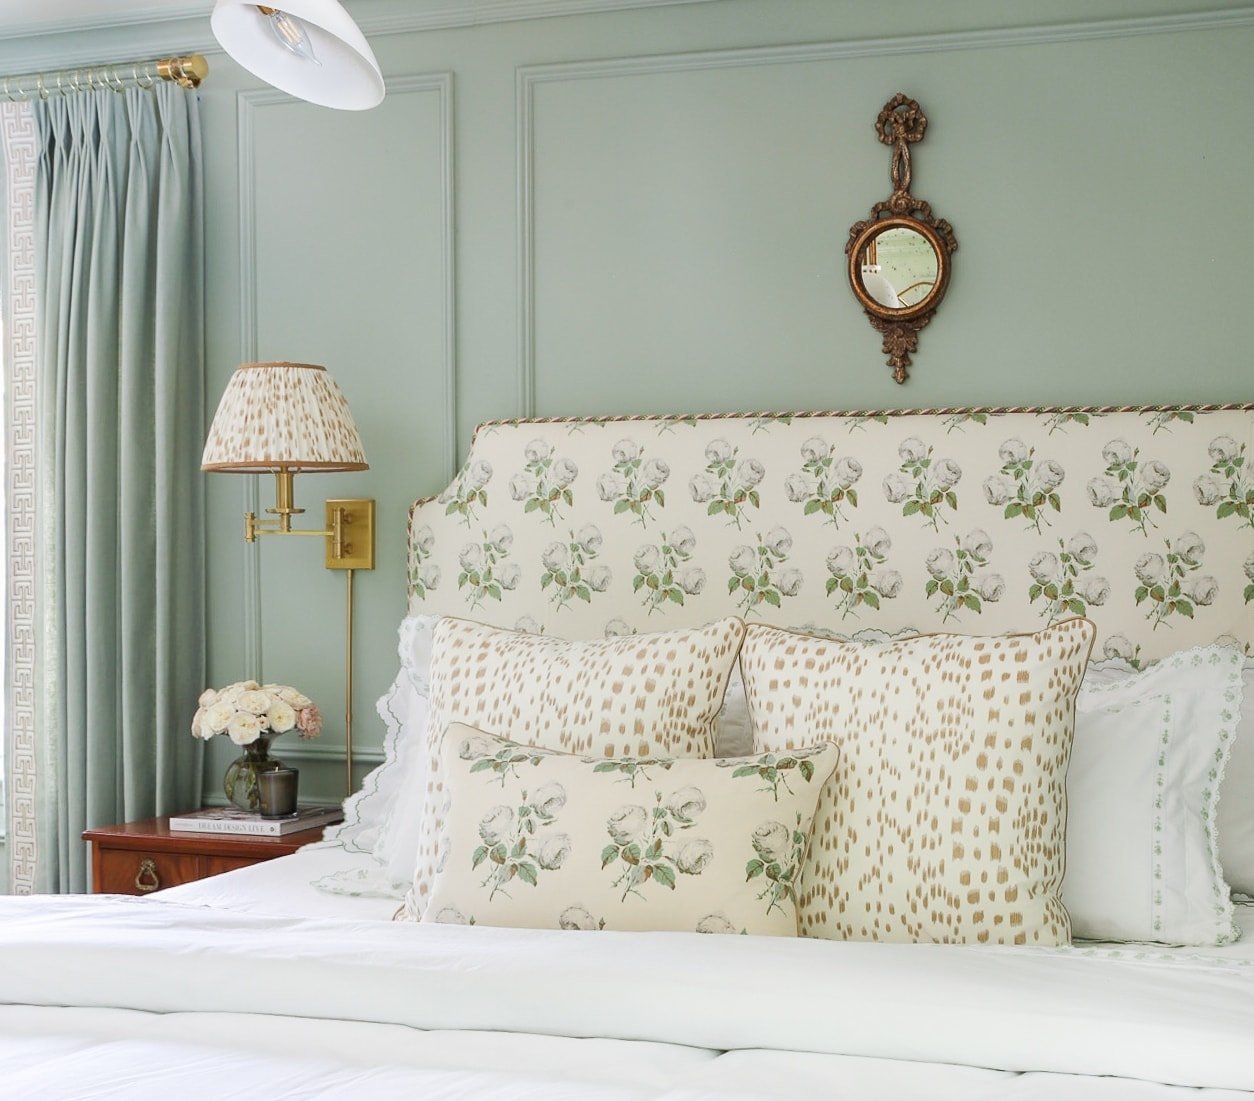
- Large and small stacked boxes (usually with a chair rail in between boxes) on each wall. This requires more measuring and cutting but I think it really elevates the look. I used the box + chair rail + box look in our bedroom and my office.
- You can even do boxes within boxes….inception.
- How much space you have on each wall, how big you want each box to be, and for symmetry, aim to have an odd amount of boxes (usually 3) on each wall, unless…
- It’s a wall with windows. Walls with windows can be tricky, but one box on either side of the window would be fine because the window is visually that third box, so you’re still pulling off the rule-of-thirds symmetry
- Whether all boxes should be the same width (i.e. in our bedroom, all middle boxes were slightly larger than the 2 end boxes).
- If you want the molding style to match the style of your home. This is a topic of debate, but I personally chose traditional style molding for our bi-level. I mean, if Laurel Bern is on board with adding traditional molding to a ranch/bi-level…say no more.
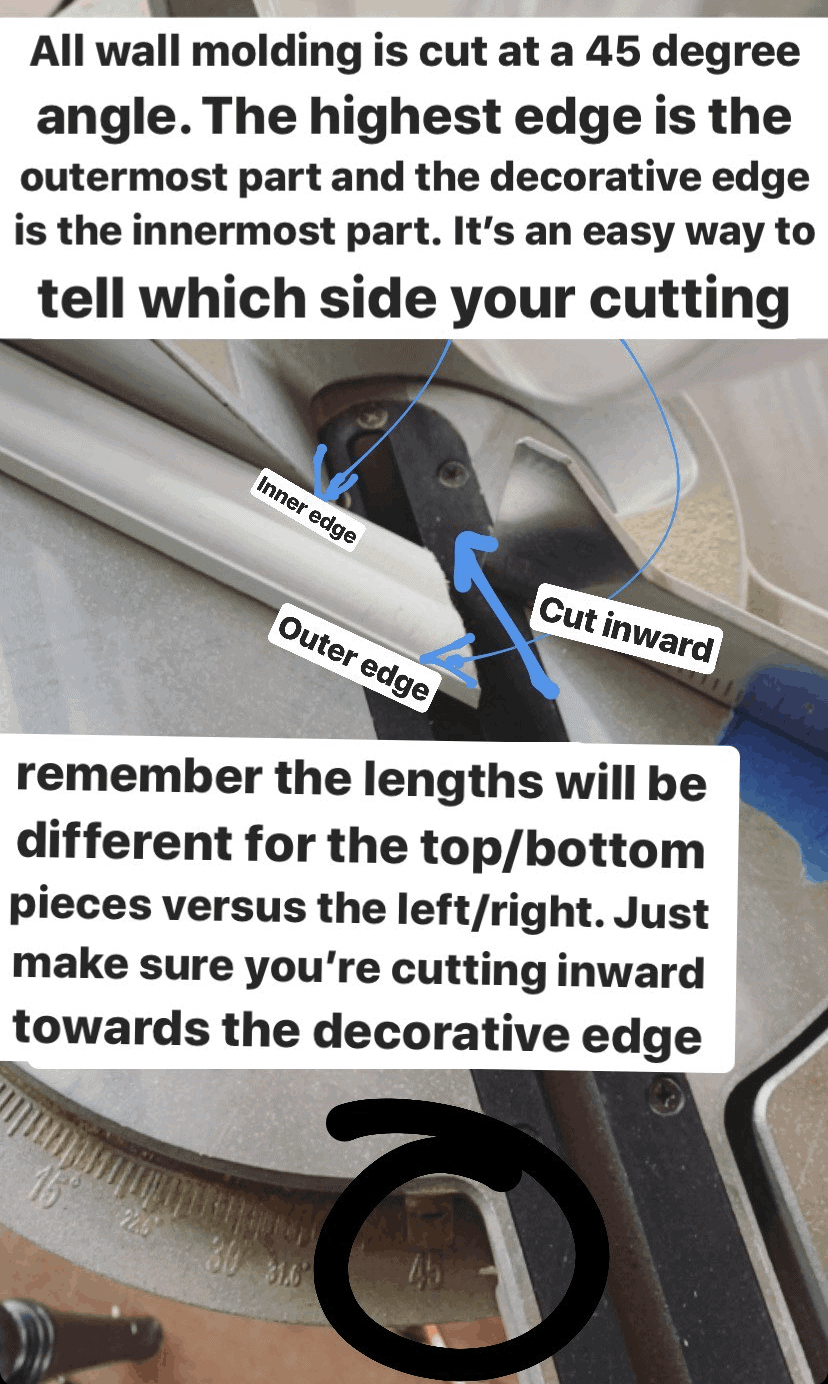
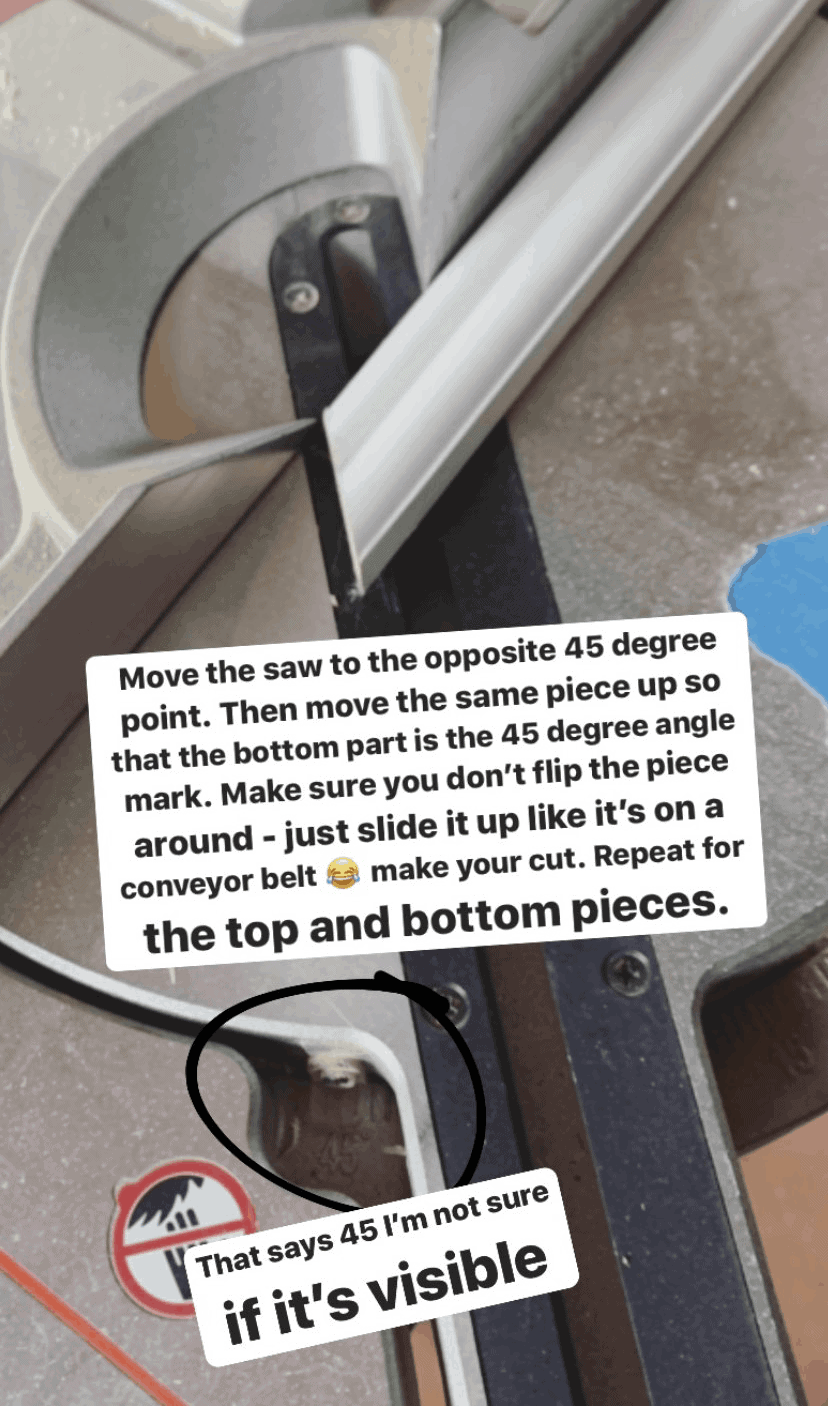
For this week’s post, I’m repurposing the visuals I created for my DIY Molding IG story tutorial a few weeks ago, as it received some positive feedback. I’d like to point out that this tutorial is for wall molding only.
If you’re planning to install crown molding, highly recommend this video and installing the crown before the wall molding
WHAT YOU NEED TO INSTALL BOX MOLDING:
- MEASURING TAPE*
- MOLDING
- MITER SAW*
- NAIL GUN*
- SQUARE BLOCK – cut to the size you’re looking to space your boxes
- FINISHING NAILS*
- CAULK*
- CAULK GUN*
- PENCIL
- LASER LEVEL*
- WOOD FILLER*
- PATIENCE 🙂
*affiliate links used
For the tutorial, I’ll be using part of my living room wall as an example. Of course, the dimensions of your wall will be different than mine, but I figured using an example wall may be a good starting point.




Crappy after + before of our whole living room wall, but it’s clear that the molding truly elevated the space – the ceilings even look higher!
Some Q&A’s I addressed via IG stories but would also like to include here:
Q: Do you paint the wall and molding the same sheen/color?
I paint the wall and molding the same color, but the walls are usually a matte finish and the molding is usually semi or high-gloss
Q: Do you recommend using it on one wall as an accent or throughout the whole room?
I think it looks more cohesive when it’s done throughout the room, but it’s personal preference.
Q: Do you re-paint the wall and molding once it’s installed or just the molding?
The way I approach painting is this:
I paint 1-2 coats on the wall before the molding. Once the molding is installed and caulked/holes are filled, I paint another coat on the wall using a smaller roller (need to get between the boxes and I hate brush strokes). Then I paint 2 coats of semi or high-gloss on the molding using an angular brush.
Q: Can I add boxes without crown molding?
I personally think crown completes the look, but you can totally install boxes without crown!
I hope this tutorial was insightful and that you can use it to install molding in your own home! As usual, please reach out or leave a comment with any questions.
xo
Alisa
As always, a useful post. I was one of those people who has been harassing you about a tutorial 🙂 Very thoughtful and detailed in your writing. Thank you for sharing.
How do you measure for doing a top and bottom box?
Gorgeous! I’m looking to add wall molding (large and small stacked boxes with a chair rail) to a nursery in the coming weeks but I’m not sure what to order. Any specifications or links you’d recommend for a traditional wall molding? I also need to add crown molding and a chair rail. Anything with actual links on what to order or what I should be looking for? (The nearest metrie dealer is 100 miles from my home).
What about adding wallpaper to boxes? Do you recommend using larger boxes when you will be adding wallpaper? I noticed you did that in your office (which is beautiful by the way).
Thank you!
Beautiful room! What is the wall color that you used to paint the walls & trim?
I also want to know! 😍
Thank you so much for addressing the paint finish on the walls and moldings! I looked all over and you were the only one that said, “Do this..” !!!
I recently saw a YouTuber use luxe-architectural.com molding but at $360 for only one wall of pre-made boxes- it’s a no for me. Which way is the most economical cor molding? Pre made or DIY? I know also where you get the molding makes a difference too.
Love this room!
Are you installing the molding right onto drywall? My whole house is drywall. I live in Florida but I know in other regions people have wood paneling. I had a home in Texas with wood paneling and molding on it and it was beautiful so putting it on drywall seems a little odd.
Yes you can put it right into the drywall. just shoot the nails at an angle, not straight in.
I loved this tutorial and used it for my dining room remodel! It’s still in progress but seriously this was soo helpful!
How would you handled off center windows on walls and spacing with the boxes? Should the boxes just be centered to each section of the wall separated by the window?
Same question I have! I hope she answers your question. 🙂
Hi, this is such a useful guide! Loved going through it.
Do you happen to know the paint shade/code/color of the blue on the wall in the first image right at the top of this article! I love it and want to replicate it along with your molding. Let me know, thanks.
Can you tell me the name of this paint please?
Our wall is 166 inches long and 106 inches from base to crown. What size and number of boxes would you recommend we install?
Thank you for posting this. It was very nice to read!
If you have two walls that are different lengths do you change the width of the boxes or the spacing between the boxes and wall edges?
Hi this was the best explanation I have found so far on a step by step guide to achieve this look.Im not very good with maths at all and this has gave me the confidence to try this thank you so much, the room looks stunning.great job.
Oh my goodness! This is such a detailed guidance. I totally appreciate it especially when you told us that precise measurement is crucial in making a great box molding too. The wall inside my bedroom looks horrible due to old age and I want to do something about it. I guess I’ll have to hire someone to repair it as fast as possible.
I went to a home improvement store today and was confused at what exactly to get when it comes to the moulding. I found something that kind of looked right and it was called ply cap. Does that sound like the right style of moulding?
I was at a home improvement store looking for moulding today and I was confused as to which one to buy. It seemed like something called “ply cap” looked the most similar to what you used. Is this the right style of moulding?
Thank you for sharing this, I found it really helpful and just completed some paneling on my walls, so pleased with the result!
Really a great tutorial! Can you do one on crown mounding installation? Your directions are so good!
PS. What is the manufacturer and color used in the molding one gas grey blue??)
Fantastic results. Don’t know if I would be able to DIY this well, but I love the look.
Hi! I love the wall color. Are you willing to share? ????????
Regarding using a laser and a spacer block….
If you are using the spacer block to make sure everything is 6″ from the ceiling and walls, what purpose does the laser serve?
Here’s my dilemma….
If my room corners aren’t plum (which they aren’t) would I want to have a nice 6″ revel all the way down as opposed to using the laser which would make mt trim perfectly plum but compared to the wall it is next to it might look a bit “off”?
Thanks!
Patrick
Hi! Thank you so much for the step by step. Very helpful, and yours came out great.
If I plan on doing this on multiple walls that are different lengths.. what is the best approach?
Hi, thank you for the step by step detail on installing panel moulding. I would like to do this in my home but have an open plan home and variety of wall heights and lots of doors and windows in between. How do you best decide on panel width for cohesiveness? For example, I have a wall that is 12 feet wide and one that is 5 feet in between doors?
Thank you!
Great tutorial! Love the detailed tips on planning and installation—super helpful for DIYers. The before-and-after really shows how molding elevates a space. Thanks for sharing!
Great guide! The detailed steps make installation so much easier—super useful for DIYers. The transformation looks amazing. Thanks for sharing! 👏😊
Fantastic guide! The clear instructions make the process so much easier—perfect for DIY enthusiasts. The end result looks stunning. Appreciate you sharing this!
This is a fantastic and detailed DIY guide on installing wall molding! The step-by-step breakdown, planning tips, and Q&A section make it super helpful for beginners and experienced DIYers alike. The personal insights and humor add a nice touch, making the process feel less intimidating. The before-and-after transformation really shows how molding can elevate a space. Great job on making such a comprehensive and easy-to-follow tutorial!
Thank you.
This tutorial was fantastic! The thorough advice on planning and installation is exactly what DIY enthusiasts need. The transformation shown in the before-and-after images is really inspiring. Thanks so much for putting this together!
Really appreciate this tutorial! The detailed guidance on planning and getting it installed is a lifesaver for us DIY folks. Seeing the before and after truly highlights the impact of the molding. Thanks for sharing your expertise!
Great DIY guide—simple, clear, and really effective. The tips and transformation make it worth trying!
Thanks for sharing this DIY molding tutorial! I appreciate your honesty about the challenge and love your quirky approach. It’s fascinating how you now find measuring and installing almost soothing – that gives me hope! I’m especially interested in your tips for planning layout and box sizes.